Microsoft Word offers a variety of cursive and handwriting fonts (or typefaces, which is the more accurate name for the different font styles), and they’re actually provided by the operating system rather than the Office version. For this story, we’ll discuss the cursive and handwriting fonts available in Windows 10.
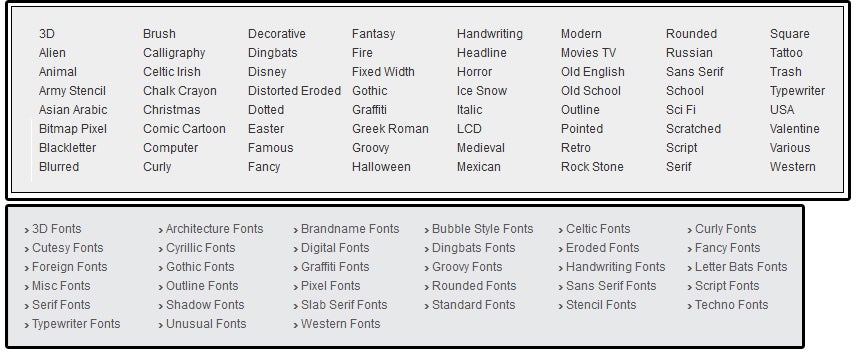
Windows 10 currently has twenty Cursive (or “Script” typefaces), two Handwriting typefaces, three Blackletter typefaces, one Greek-Roman, and once Curly or Fancy typeface. Typefaces often fall into multiple categories; for example, Script and Handwriting typefaces are also classified as Calligraphy, Fancy, and Decorative. The Blackletter typefaces are also called Old English and Medieval; and the Greek Roman typefaces crossover with the Roman, Serif, and Gothic typefaces. (Windows limits its categories to Text, Informal, Display, and Symbol). (Feeling creative? You can make your own fonts in Windows 10, too!)
 Melissa Riofrio/IDG
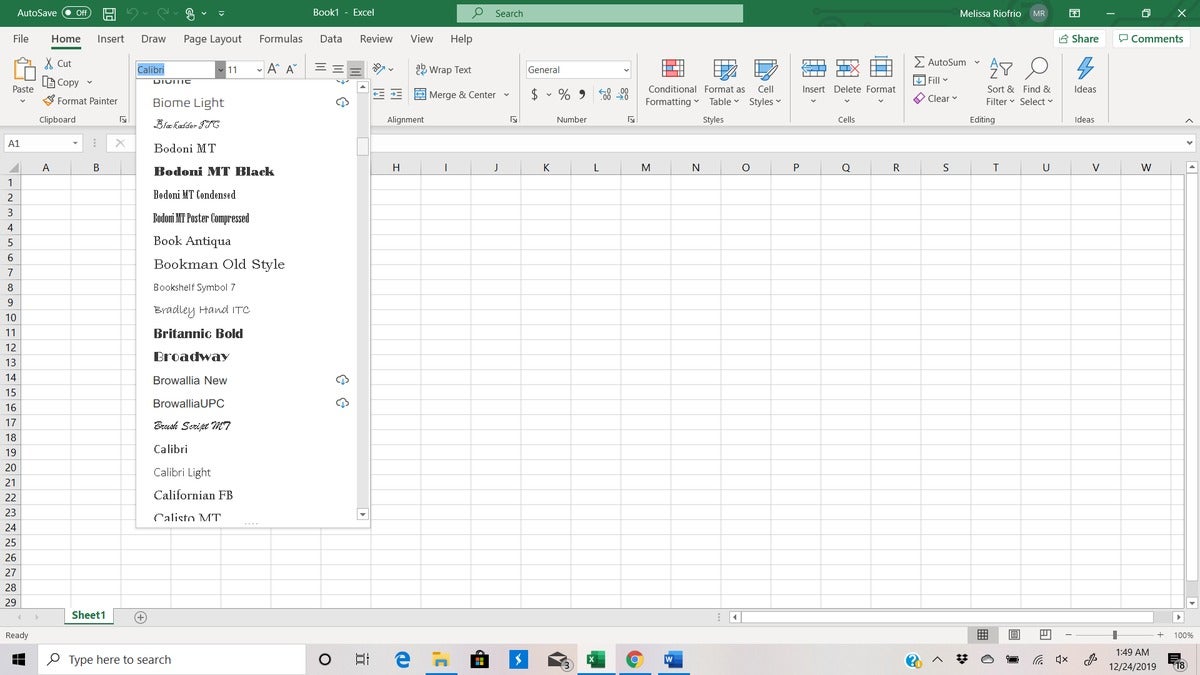
Does Microsoft Word have handwriting or cursive fonts? Click the drop-down list in the Font section of the Ribbon menu to see the full list.
You can review the current Windows 10 font list (and information on which products support them) on Microsoft’s website, although it neither shows nor tells you which typefaces are cursive. For a visual search, it’s best to open Word and click the drop-down list of font names in the Font section of the Ribbon menu. Scroll down to view the fonts, each font’s name written in its own lettering.
 JD Sartain / IDG Worldwide
Typeface categories
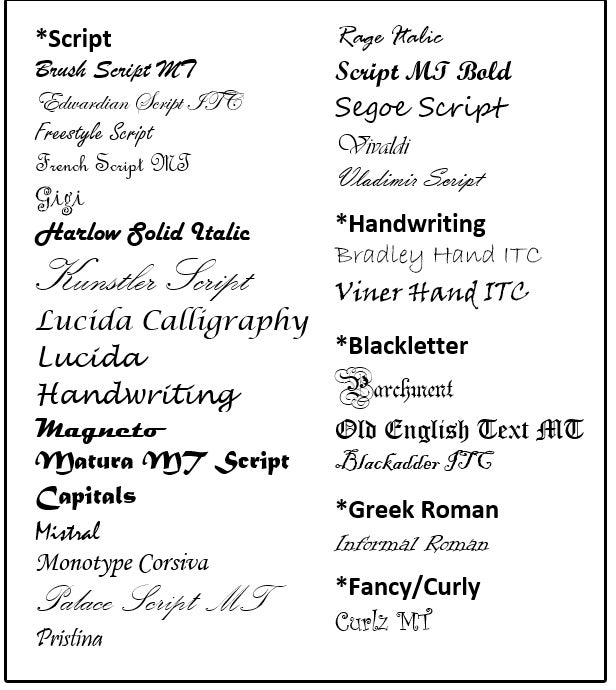
You can also type a font name at the top of the drop-down menu to go straight to ones that interest you. The current Windows 10 Script typefaces include Brush Script MT, Edwardian Script ITC, Freestyle Script, French Script MT, Gigi, Harlow Solid Italic, Kunstler Script, Lucida Calligraphy, Lucida Handwriting, Magneto, Matura MT Script Capitals, Mistral, Monotype Corsiva, Palace Script MT, Pristina, Rage Italic, Script MT Bold, Segoe Script, Vivaldi, and Vladimir Script.
The Handwriting typefaces include Bradley Hand ITC and Viner Hand ITC. The Blackletter group includes Parchment, Old English Text MT, and Blackadder ITC. And last, the Greek Roman and Curly/Fancy are Informal Roman and Curlz MT, respectively.
 JD Sartain / IDG Worldwide
Windows 10 typefaces
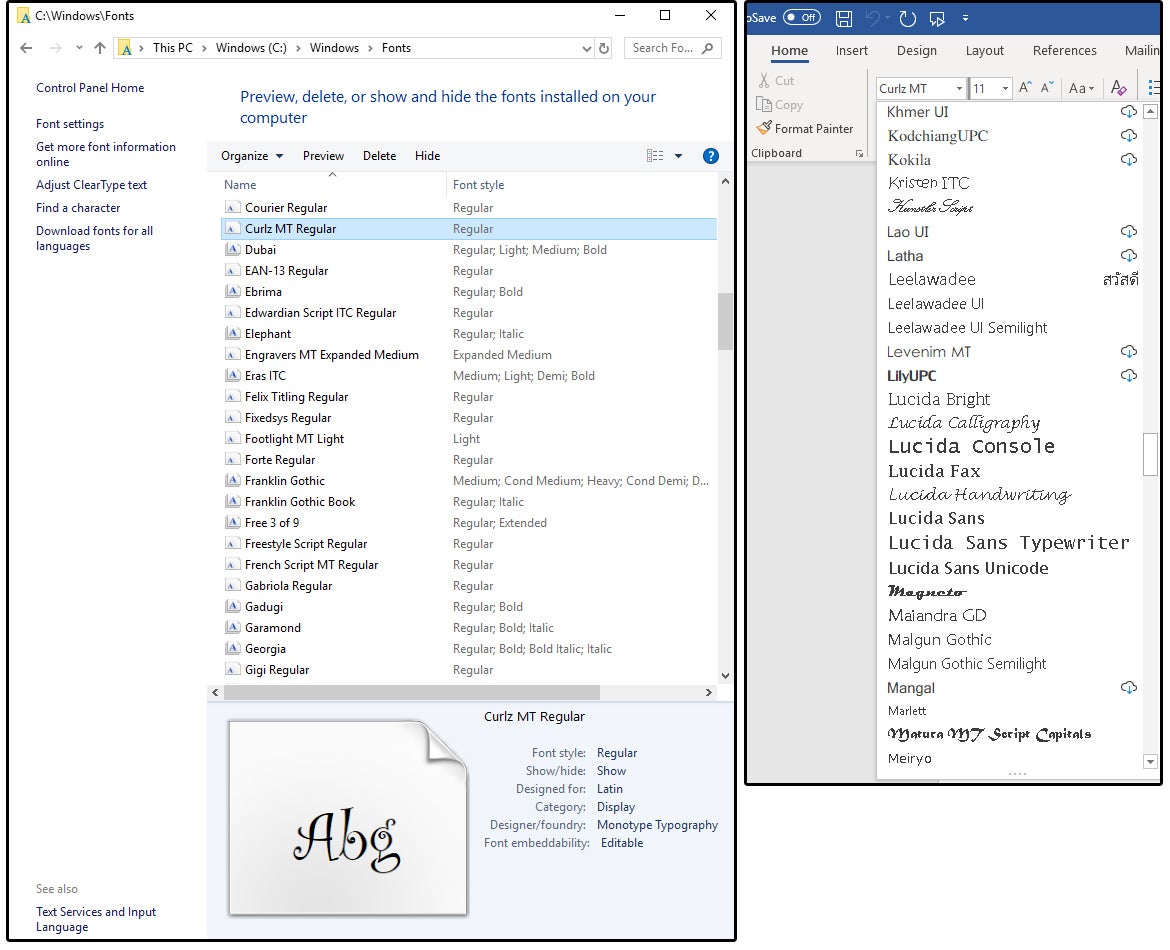
If you have a different version of Windows or just want to see which typefaces/fonts are available on your system, open the Fonts folder and review the list.
1. From your desktop, select the C: drive, then locate the Windows folder and select (click or double-click) Windows Fonts.
2. Use your mouse to shrink the window from the bottom up, so an image of the selected typeface displays at the bottom of the window. Cursor down through the list to view specific fonts.
 JD Sartain / IDG Worldwide
View + select typefaces from the Windows-Fonts folder or the Word-Fonts list
If the Windows 10 typefaces do not meet your needs, you have many, many other choices–thousands of downloadable typefaces from dozens of font websites. Hundreds of those sites are free and available with a simple Google search.
Downloading is easy and hassle-free. Here’s how to get started.
1. Choose a category, or type a font name in the Search box, or just page down through the thousands of pages. Choose a typeface, then click the Download button.
2. Windows displays the Download dialog, asking if you want to Open or Save the file. Choose Save and click OK.
3. Windows saves the .ZIP file in your Downloads folder.
4. From there, you can use Win Zip or 7-Zip to open the zipped folder. Just double-click the .ZIP file, and Windows associates that file with whatever zip program you have on your system. If the current Downloads folder is not where you want these files saved, click the Browse button and choose a different folder.
 JD Sartain / IDG Worldwide
Download and then unzip free fonts from Internet sites
NOTE: Do not choose the Fonts folder. It should not be available. Choose any other location that works for your purposes.
A few final tips as you start collecting fonts:
Store them carefully: I have a Download Fonts folder on my C: Drive to save all downloaded font files. It’s a good idea to have a backup: If your operating system fails or corrupts, you’ll have a copy of all those great fonts you’ve been collecting throughout the years.
Keep fonts with the documents that use them: If you use a downloaded font for a specific project and your system corrupts, or you’re forced to use a different computer to reopen and modify or print that project, that special font will not be available. Windows will substitute whatever font is closest to the original, which will completely ruin your project. Therefore, it’s a good idea to copy the fonts used in each project to that project’s folder so those fonts are attached to the project.